Grilled Asparagus & Wild Ramps

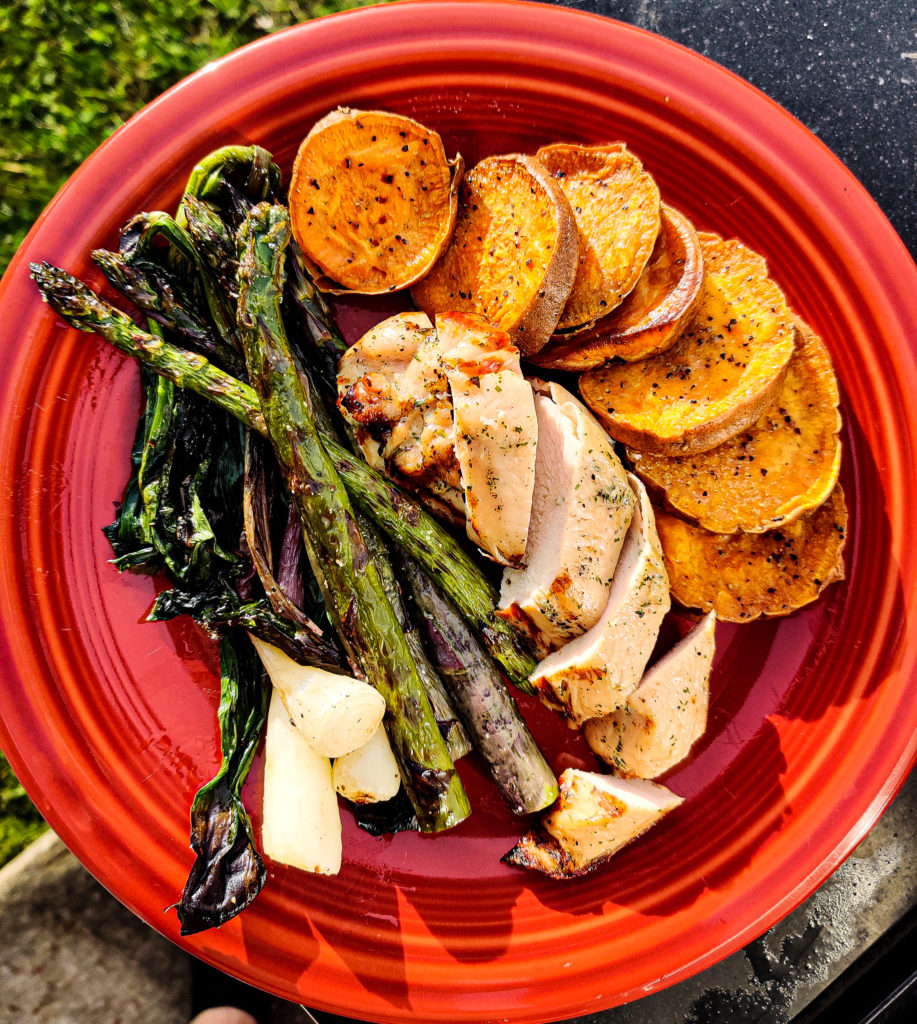
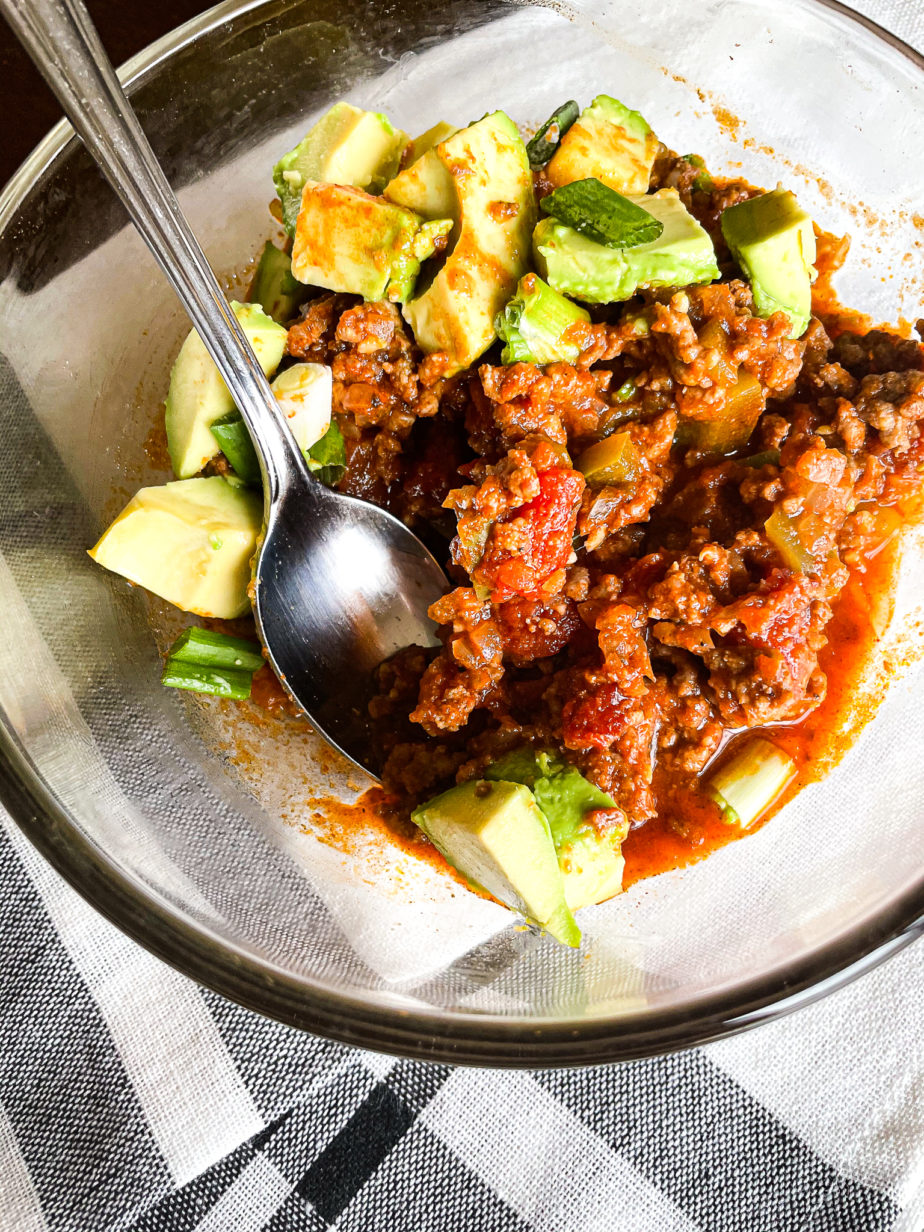
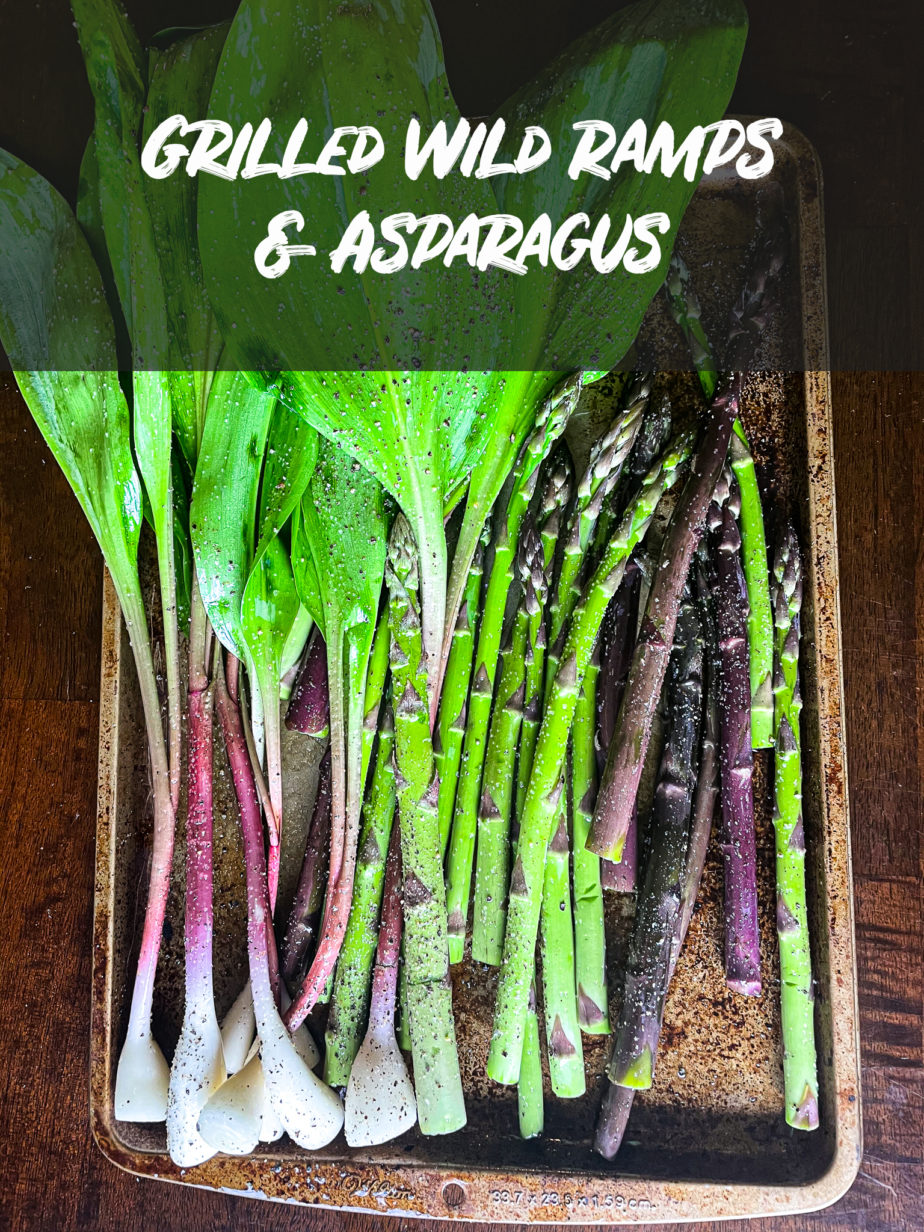
This weekend was the first time we’ve visited our local farmer’s market since the beginning of this maddening pandemic. It was absolutely amazing to be reminded of the vibrant local food culture we have here in Columbia and that it is still alive and well after all this craziness. We picked up some beautiful veggies – please see the gorgeous purple asparagus below! We also had the good fortune to catch a booth with some wild-foraged ramps. The first thing we wanted to do with these veggies was keep it simple and throw them on the grill with just some simple seasonings so we could just taste the veggies themselves. This recipe for Grilled Asparagus and Wild Ramps is the product!

A note on ramps! Ramps are a wild allium, related to the leek and the shallot. They are very picky about where and when they grow, and are available for a very short time in the spring in the regions they grown in at all! If you’re not lucky enough to have ramps available to you at the moment, leeks can be substituted.

Ingredients

  • 1 – 2 bunches wild ramps (or 2 large leeks)
  • 1 lb asparagus
  • 2 – 3 tbs olive oil
  • salt and pepper

Instructions

  1. Fire up the grill! Bring it up to medium high heat
  2. Clean the roots from the end of the ramps (but leave most of the white part!). Chop the tough ends off the asparagus
  3. Drizzle the ramps (including the leaves!) and asparagus with olive oil, and toss lightly with your hands to coat. Season generously with salt and black pepper.
  4. Put the ramps and asparagus out on the grill in a single layer, allowing to char on each side for 1 – 2 minutes (the crispy blackened ramp leaves we got out of our batch were my favorite part)
  5. Serve immediately with grilled chicken, a light pasta dish, or next to a juicy steak
  6. That’s it, you’re done, you made the easiest most delicious side dish ever!

Spicy Gochugaru Bacon & Brussels Sprouts

My content may contain affiliate links. If you take action (i.e. subscribe or make a purchase) after clicking one of those links, I’ll earn some coffee money – which I promise to drink while creating more helpful content like this. Thank you for your support! Click here to read my full disclaimer.

This recipe is an Alex special! One of our favorite restaurants in Columbia has turned this guy from a brussel sprouts hater to a brussels sprouts lover! Their brussels sprouts side features thick cut bacon and roasted garlic – Alex got in the kitchen the other day and decided to take that thought to the next level. Gochugaru Bacon and Brussels Sprouts may be our new favorite homecooked side dish.

What’s gochugaru you ask? Gochugaru is Korean chili powder or chili flakes. They are a little more mild than the typical crushed red pepper flake, but can still pack a bit of a punch! You can substitute crushed red chili flakes or (be careful with this one) cayenne instead of gochugaru.

Ingredients

  • 1 lb large brussel sprouts, cut in halves or quarters
  • 6 – 7 slices thick cut bacon (we used Wright’s!)
  • 4-5 cloves fresh garlic (more to taste or if available lol)
  • 1 – 2 tsp onion powder
  • 1 – 2 tsp korean chili flakes (gochugaru – can substitute crushed red chili flakes)
  • salt and black pepper to taste
  • 2-3 tbs Irish salted or unsalted butter (we used Kerrigold)
  • 2 tbs lemon juice

Instructions

  1. Trim then chop brussel sprouts several different ways for different sizes and textures e.g. halves, diced, chopped, sliced and halfed, etc. for whatever combo suits you. Place in colander to wash and then set aside.
  2. Roughly chop the garlic. No need to go super fine or garlic smasher them you want them to show up in the mix.
  3. Stack a few pieces of bacon (or all of them if you have a good enough knife) and slice in to small strips. Separate by hand a bit before setting aside.
  4. Set a large cast iron skillet over medium heat to bring to temperature
  5. Add bacon to pre-heated skillet and keep heat medium to low while stirring bacon often.
  6. Add garlic to cooking bacon and continue to stir occasionally for 1-2 minutes. Return heat to medium and allow to sit until bacon has rendered a bit of fat but before the bacon gets too crispy.
  7. Add brussel sprouts to skillet and stir until covered with the bacon grease.
  8. Then, stir in onion powder and gochugaru. No matter what type of chili you’re using here, start small if you’re not sure about spicy stuff, and add more if you find it needs it.
  9. Add salt and black pepper to taste, keeping in mind whether your butter is salted or not.
  10. Preheat your oven’s broiler at this point and set your rack to one of the higher positions.
  11. Lower skillet heat to medium-low and add butter and lemon juice. Stir the ingredients and allow brussels sprouts to just begin to get tender.
  12. Finally, add cast iron to broiler in oven. Broil until bacon begins to crisp and brussel sprouts are cooked through to your liking!
  13. Remove from oven and serve immediately.

Serving Suggestions

Broiled Chipotle Shrimp Salad Bowls

You know, until I started writing things down for this blog I had no idea so many of the recipes in my personal go-to list involved chipotle seasonings and peppers – it’s amazing the things you just do all the time and never notice! These broiled chipotle shrimp salad bowls were an experiment on a whim, and I’m really happy with how it turned out!

The coleslaw in this bowl is a creamy apple slaw recipe from Spend With Pennies and may be my new standard.

Broiled Chipotle Shrimp Bowl Ingredients

Makes 2 – 3 servings

  • 1 lb frozen, peeled, deveined shrimp (tails off)
  • 2 tbs butter
  • 2 tbs olive oil
  • 1 tbs taco seasoning
  • 1/2 tsp garlic powder
  • 1 medium chipotle chili in adobo sauce
  • 2 tsp adobo sauce (from the chipotles in adobo sauce can)
  • dash salt
  • 1/4 tsp sugar (optional)
  • 2 – 4 cups spinach
  • 1 – 1.5 cups apple slaw

Broiled Chipotle Shrimp Bowl Instructions

  1. Thaw the shrimp in a colander under running water, this will only take a couple minutes! Remove tails if needed. Place thawed shrimp in a container or ziploc bag (we’ll be marinating in here)
  2. Take your chipotle pepper and slice it open, scraping out most of the seeds from the inside. Chop in a small dice.
  3. Melt the butter in a small bowl. Stir in olive oil, taco seasoning, garlic powder, sugar (if using), chopped chipotle, and adobo sauce.
  4. Pour the butter mixture over the thawed shrimp and stir (or massage bag) to coat the shrimp. Marinate for at least 30 minutes to up to a few hours. The butter will set up a little bit – that’s okay!
  5. Place your oven rack in one of the higher positions and preheat the broiler to 500 – let it get pretty hot in there!
  6. Cover a sheet pan in foil (for easy clean up!). Spread out the marinated shrimp in one layer so they are not overlapping.
  7. Broil the shrimp for 5 minutes, then check for doneness – if the shrimp are not pink and starting to firm, broil for 1 – 2 minutes more, being careful to not burn or overcook them.
  8. To serve, in each bowl place 1 – 2 cups fresh spinach and 1/2 cup or so apple slaw. Top with chipotle shrimp. This would also be great with cilantro and a little lime juice squeezed over top!

Wondering what else to do with those chipotle peppers in adobo sauce? Try out our Chipotle Chili recipe.

broiled chipotle shrimp salad bowl
Apple Slaw

Ginger Garlic Brown Rice & Peas

Ginger Garlic Brown Rice & Peas is a great side for soupy mains, like the wonderful Instant Pot Coconut Butter Chicken or just on its own with a fried egg on top! It has enough subtle flavor to give a flavorful dish a little something extra. I had peas in the freezer when we made this but you could definitely toss in pretty much any veggie or green – whatever you have on hand!

Ginger Garlic Brown Rice & Peas Ingredients

  • 2 cups chicken broth (my favorite is the College Inn brand!)
  • 2 tbs fresh ginger, sliced
  • 4 – 5 cloves garlic, minced
  • 1 tbs ghee, butter, or olive oil
  • 1 cup brown rice
  • 1 cup frozen peas
  • Salt and pepper, to taste

Ginger Garlic Brown Rice & Peas Instructions

  1. Add the chicken broth, garlic, ginger, and ghee to a medium pot and bring to just boiling
  2. Add the brown rice, reduce the heat to low and cover. Cook the rice for 45 minutes or until tender. If the rice looks like it doesn’t have enough liquied, add more chicken broth a tablespoon at a time.
  3. Once the rice is cooked, remove the lid and remove the ginger slices. Add the peas, stirring them in and allowing to cook until the veggies are heated through
  4. Taste for salt and add some if needed. Add a dash of black pepper
  5. Enjoy! This rice is great with a fried egg and some chili oil on top, or as a side to curries or saucy dishes
ginger garlic brown rice and peas

Instant Pot Coconut Butter Chicken

This Coconut Butter Chicken recipe is based on a recipe I first found on The Bettered Blondie – we make it a couple times a month and it’s a great meal to make on a weeknight. It’s a little bit creamy, with lots of deep flavors and the cinnamon is a delightful twist. Just throw everything in the Instant Pot (or a pressure cooker) and then a little simmer at the end and you’re good to go!

Coconut Butter Chicken Ingredients

  • 1 tsp salt
  • 2 tbs garam masala
  • 1.5 tsp cumin
  • 1 tbs chili powder
  • 1/2 tsp cayenne pepper (optional)
  • 2 – 3 lbs boneless, skinless chicken thighs, cut in 1″ cubes
  • 1 can whole fat, unsweetened coconut milk
  • 14.5 oz. can of tomato sauce
  • 2 tbs ghee or clarified butter
  • 1 – 2 tbs lemon juice
  • 4 – 5 cloves garlic, minced
  • 2 tbs fresh ginger, minced or grated
  • 1 cinnamon stick
  • 1 tbs tapioca starch (can sub corn starch, potato starch, or flour!)
  • 1/4 cup cilantro, chopped
  • 1 – 2 limes, quartered

Coconut Butter Chicken Instructions

  • In a small bowl, mix together the salt, garam masala, cumin, chili powder, and cayenne pepper (if using)
  • Cut chicken thighs into cubes and add to the instant pot
  • Add the rest of the ingredients (don’t forget the cinnamon stick!) except the tapioca starch and cilantro (they’ll come in later!)
  • Pressure cook on high for 15 minutes, and then release the steam carefully before removing the lid
  • Turn on your instant pot’s saute feature and bring the chicken to a boil. Stir in your thickening agent (we used tapioca starch but another starch or flour will work as well!) making sure there are no clumps
  • Allow the chicken to simmer and thicken up for 5 – 8 minutes, or just keep an eye on it and turn it off when it gets to your desired thickness
  • We made a batch of Garlic Ginger Rice & Peas, which makes a great pair with this dish! In a bowl or plate, I recommend complementing the butter chicken with something that will help soak up all that delicious butter chicken juice – whether it’s rice, cauliflower rice, or a pile of greens.
  • Just before eating, top with a sprinkle of cilantro and a squeeze of lime juice

Smoky, Spicy, Simple Chipotle Chili

My content may contain affiliate links. If you take action (i.e. subscribe or make a purchase) after clicking one of those links, I’ll earn some coffee money – which I promise to drink while creating more helpful content like this. Thank you for your support! Click here to read my full disclaimer.

This is our current go-to chili recipe, we make it a few times a month. It’s super easy to throw together on a weeknight and is low-carb to boot!

We originally started making this style of chili while on our first Whole30. It was one of the first times I’d ever even had chili without beans in it, so I was a little skeptical. The recipe below is loosely based on one from the wonderful Whole Cook blog, and I’m so glad we found it when we did!

Note: The recipe in its current form is not Whole30 compliant – to make it so, simply omit the canned chipotle peppers and sauce.

The chipotle chili powder and canned chipotle peppers in adobo in this recipe are what give it a little spicy kick. If you’re sensitive to spice, start small here and taste as you go. We can regularly find the peppers in the same aisle as the taco shells and salsa. You may be able to find the chipotle chili powder in a typical seasoning section at the grocery store, but we’ve had to order it from time to time as well. Here is one I’ve ordered in the past!

Ingredients

Chili Seasoning
  • 2 tablespoon chili powder
  • 1/4 – 1/2 tsp chipotle chili powder
  • 2 teaspoon paprika
  • 2 teaspoon onion powder
  • 2 teaspoon garlic powder
  • 1.5 teaspoon ground cumin
  • 1 teaspoon salt
  • 1 teaspoon black pepper
Chili
  • 2 lbs ground beef, turkey, or chicken
  • 1 bell pepper, chopped
  • 1 large onion, chopped
  • 4 tablespoons garlic, minced
  • 1 6 oz can tomato paste
  • 2 – 4 chipotle peppers in adobo sauce, seeds scraped out and chopped (omit if Whole30)
  • 2 tsp adobo sauce (from pepper can, omit if Whole30)
  • 2 14.5 oz cans diced tomatoes
  • 1 cup chicken broth

Directions

  1. In a small bowl, combine all chili seasoning ingredients and set aside
  2. Heat a large pot or dutch oven over medium-high heat. Crumble the beef into the pan and allow it to start to brown
  3. Throw in the bell pepper, onion, and garlic and saute the beef and veggies until the beef is no longer pink and the onions have begun to soften
  4. Add in the chili seasoning and mix with the meat and veggies. Allow to cook for a minute or two
  5. Add the tomato paste and chopped adobo peppers and mix until combined. Cook for 1 – 2 minutes.
  6. Add in the rest of the ingredients. If you like a soupier chili, add a little extra chicken broth.
  7. Once all is combined, bring to a simmer. Once simmering, lower the heat and cover. Let simmer for 20 – 30 minutes.
  8. Uncover and taste for salt – add more if desired.
  9. Serve with your favorite chili toppings – this time we chose avocado and green onion! Just as delicious with cheese, crackers, or some crusty bread for soaking up the last little bits.